


Menagerie Creative’s illustrator and designer Tony Hsu invites you to journey along as he celebrates our multi-cultural studio with a one-of-a-kind poster and study of planetary formation.
PART ONE: Typographic Architecture
Constructing the dimensional typography for this project requires both Adobe Illustrator and Photoshop. Begin by designing the letterforms in Illustrator, then export the paths into Photoshop to apply lighting and textures.
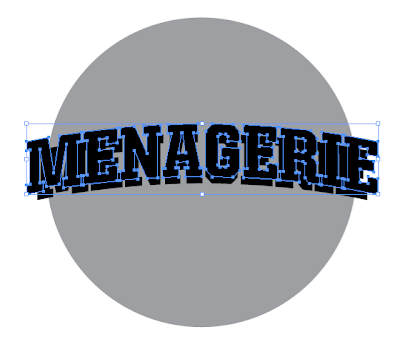
Step 1: Create a circle to establish an idea of how the type should sit on the sphere. Select a bold font that will help the type read once distorted.
Step 2: Warp the text by going under EFFECT>WARP>ARC. Set the arc bend to approx 12%.

Step 3: Make a copy (apple+c) of the original type in case changes need to be made to it later. After the type has been warped, expand the type into paths by selecting OBJECT>EXPAND APPEARANCE. After expanding, copy (apple+c) and paste in front (apple+f). Adjust the type according to the correct perspective and scale it by holding shift+option+drag just slightly.
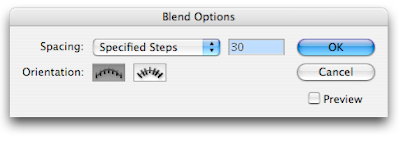
Step 4: Next, make a copy (apple+c) of the type into the clipboard. (This will be needed later). Now go to OBJECT>BLEND OPTIONS to modify the blend. Change the spacing to "specified steps" and enter a setting of 30. Click “OK” when you’re done. Select both of the types, and go to OBJECT>BLEND>MAKE. Now paste in front(apple+f) the type from the clipboard and change the color to white.

Step 5: Now that the type is okay, import the paths into Photoshop to add texture and lighting effects!
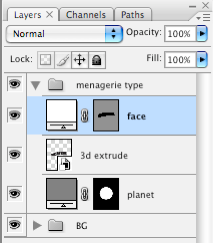
First, in the Illustrator file, copy the “blend” then paste (apple+v) in Photoshop as “smart object”. Second, in the Illustrator file, copy the “planet” then paste in Photoshop as “smart object”. Third, in the Illustrator file, copy the “face” then paste in Photoshop as “shape layer”.
Now that we have our type properly laid out on the planet we can begin adding textures and background to the rest of the type.
Step 6: You should have 3 layers in your Photoshop document.
1) planet
2) blend of the type
3) face of the type.
Step 7: Now to create a drop shadow on the type.
a) Apple+left click the blend layer to select it.
b) Create a new layer and label it shadow, fill the selection with black by
going to EDIT> FILL. Choose foreground color and make sure that it is black.
c) Deselect the shadow layer, and apply a gaussian blur by going to FILTER>BLUR.
d) Make a clipping mask of the shadow layer onto the planet layer by holding down the option key and clicking in between the shadow and planet layer. This removes the shadows outside the planet’s area.

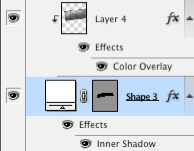
Step 8: Next, bring in a texture for your type. Place it on top of your face layer and make a clipping mask (option+click in between the layers). Then, apply an inner shadow to the face layer in order to give the type a little more depth. Add some color to the texture layer by adding a color overlay effect, set that effect to multiply to let the texture underneath show through.

* once your texture is laid onto the type. Change its layer mode to a setting that will make your type legible.
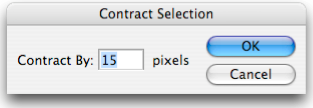
Step 9: Now that we have some color and texture on the type. Let’s give it a little variation (dark and light) in values so that it doesn't look so mechanical. Option+left click on the face layer to bring up its selection. Go to SELECT>MODIFY>CONTRACT. Enter a value that scales the selection so that you can apply some color to the inside of the type.
Once you have your selection, go to SELECT>MODIFY>FEATHER and enter a value anywhere from 10~20.
With your selection still available, create a new layer and name it variations and brush in darks and lights using a soft-edged brush. Press “x” to change from black or white when in the brush mode. After you are satisfied with your darks and lights, change the variations layer from normal to overlay.

Now you have your type all set up for the next tutorials!
Below are the links to PART TWO and THREE of the TUTORIAL
A Global Menagination - PART TWO
A Global Menaagination - PART THREE
0 comments:
Post a Comment