Showing posts with label Tutorials. Show all posts

Tuesday, August 31, 2010

A Global Menagination – Part 3


Polar Panorama Effect

This last part of the tutorial is working with panoramic photos and using Photoshop’s “Polar Coordinates” filter to create a circular image to wrap around the planet. First, there are a few things to keep in mind when you create your panoramic shot:

• Panoramas cropped to have an aspect ratio of at least 2:1 (the width should be at least two times the height) work best. Wider photos are better.

• The bottom area of your photo should have very little detail (ie. sand, asphalt, or water). This area will
become the center of your planet and will be distorted the most.

• The upper area of your photo should also be light on detail— preferably just one color (ie. blue sky, night sky, etc.).

• The left and right edges of your photo should match or come close to matching each other.

• Since the left and right edges of your photo will be joined, the horizon must be exactly horizontal. If they
are at different heights your planet will have a big crack on the surface.


Step 1: In a new Photoshop document, prepare your image for the polar filter. Follow the guidelines above and incorporate the buildings you would like to stand out in the image.


Step 2: Once you have your buildings laid together, stretch the image so that it becomes a perfect square. Flatten your image, then go to Select Image>Image Size. Uncheck "constrain proportions" and set the height to the same value as your width. Next Rotate the image 180 degrees. (Image>Rotate Canvas>180)

You should have something similar to the image below.


Step 3: Apply the Polar Filter to wrap the image into a sphere. Choose Filter>Distort>Polar Cordinates and in the resulting dialog box, select the "Rectangular to Polar" setting. You should have something like the following...


Step 4: The rest is a just a little digital retouching. Rotate your planet to your liking, adjust the contrast and colors, clean up your edges where the left and right borders come together. (The clone stamp and healing brush is very handy here). We can now import the flattened image into the previous combined tutorial file. The tutorial file is a combination of the final files from the typographic and planet tutorials.

Step 5: Now that you have brought in your panoramic buildings. Create a layer mask so that all your buildings are the only elements left showing on the layer. Add a “brightness/contrast adjustments” layer so that you can enhance and improve your image’s quality.


Your planet should start to look complete.


Step 6: Add some more buildings on top of the planet to give it more details near the continents. Google Earth is a great way to find the perfect angle for your cities since it offers the versatility to move and rotate your camera angle as you please. You want something that offers a bird’s-eye view at a skew. Mask out an edge of the city so that you can have some variation of buildings protruding up from the mask.


Before we import the image, desaturate (IMAGE>ADJUSTMENTS>HUE/SATURATION) the colors so that your city is black and white. It will be easier to apply color effects once you have your city laid out on the planet.

Step 7: Drop your city into your image and use the warp tool (EDIT>TRANSFORM>WARP) to adjust the edges so that it looks like it conforms around the sphere.


Repeat Step 6 & 7 for the other side of your city and you should have something like the image below.


Step 8: Next, it is time to give the buildings some color. In your layers palette, add a gradient map on top of your buildings), and change the layer mode to "Color Dodge". Choose a color for the highlighted color as well as a dark for your shadows.


Step 9:
Now we need to bring a little more contrast to the cities. Add a "Curves” layer on top of your “buildings” layer and adjust your curves so that you have a better balance of blacks and whites on your buildings.


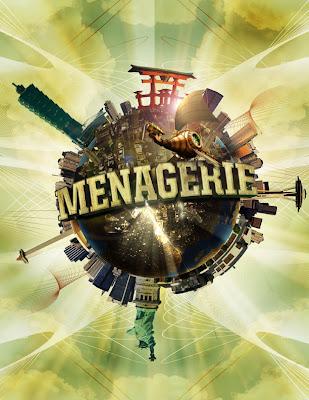
Step 10: Now you are all set. Use varying opacities and brush sizes to bring out specific highlights or to burn darker shades in some areas. Brush some colors and experiment with the different layer modes to see what effect gives your planet the best results you are looking for!


Below are the links to PART ONE and TWO of the TUTORIAL

A Global Menagination - PART ONE

A Global Menaagination - PART TWO
Tuesday, July 13, 2010

A Global Menagination – Part 2


The Birth of a Planet
Now that the type is complete, we can start working on the planet.


Step 1: Select a texture from a rock, or experiment with different textures to see which works best for the planet.
Step 2: Create a new document, use the elliptical marquee tool, hold the SHIFT key and drag your mouse in order to make a perfect circle. Now, fill the circle with a solid color LAYER>NEW FILL LAYER>SOLID COLOR.
Step 3: Open the rock texture document in Photoshop and drag the image onto your circle document. Group the rock texture as a clipping group to the circle by clicking in between layers while holding down OPTION.


Step 4: Right click on the circle to bring up its selection. With your texture layer selected, apply the spherize filter (FILTER>DISTORT>SPHERIZE) on the rock texture. Next, add a curves adjustment layer (LAYER>NEW ADJUSTMENT LAYER>CURVES) above the texture layer to adjust contrast to surface texture as needed.


Step 5: Right click on the circle layer to bring up its selection. Fill a new layer with black and deselect the layer. Apply a gaussian blur filter to the layer to get a soft edge for the planet’s shadow. Clip the image to the circle layer to get rid of the excess areas of the shadow. Now change the layer mode from normal to multiply and lower the opacity to 85%. Feather the edge to make the transition of the shadow believable.


Step 6: Give the planet a little bit of color by adding a gradient map adjustment layer (LAYER>NEW ADJUSTMENT LAYER>GRADIENT MAP) above the rest of the other layers. Select a color for your planet and change the layer mode from normal to hue.


Step 7: We will now add bodies of water to make the planet look more believable. On a new layer, select a dark blue color and use a hard-edged brush to brush in some areas to represent the ocean. Reference other images of planets for help as needed.


Step 8: In order to create a sense of depth to the water, apply an inner glow to the blue ocean layer.


Step 9: Create a bursting effect from the planet. First, create a new layer and use a dark color to draw in some cracks in the planet. Then, switch the layer mode to overlay.


Step 10: After the cracks are drawn in, right click on the layer to bring up its selection. Create a new layer above the cracks layer and apply a lighter color to airbrush in. Now, deselect the the layer and apply a gaussian blur to the glow.


Step 11: Create some rays that are bursting out of the planet. This is a fairly simple trick that can be useful in creating some really effective rays. Start by creating a new document (8.5 x 11"). Press "D" on your keyboard to bring your color palettes to default black and white. Use the gradient tool and drag from top to bottom on your document to get the following image.


Step 12: Go to FILTERS>DISTORT>WAVE. Try to get a variation of thick and thin lines by experimenting with the different sliders. Click “OK”.


Step 13: Go back to FILTER>DISTORT>POLAR COORDINATES. Make sure "rectangular to polar" is selected and click “OK”. Invert (apple + I) the image and drag it onto the planet document.


Step 14: Now that the rays are done change the layer mode to color dodge and apply a gaussian blur to the rays layer.


Step 15: Apply a layer mask to the rays layers and mask out the areas of the ray that wouldn't shine through the planet.


Step 16: Now, the rays need a little variation. Add a new layer and use your gradient tool (set to radial), use the foreground to transparent setting and start adding a little bit of glows in different areas of the cracks.


Step 17: Add some night lights to the planet. Search for "earth lights at night" for reference. After you find a nice image for reference. Bring the image to the planet document and set the layer mode to color dodge.


Step 18: Mask out the areas of the image to fit onto the land areas of the planet.

Below are the links to PART ONE and THREE of the TUTORIAL

A Global Menagination - PART ONE

A Global Menaagination - PART THREE


Tuesday, June 1, 2010

A Global Menagination – Part 1


Menagerie Creative’s illustrator and designer Tony Hsu invites you to journey along as he celebrates our multi-cultural studio with a one-of-a-kind poster and study of planetary formation.


PART ONE: Typographic Architecture

Constructing the dimensional typography for this project requires both Adobe Illustrator and Photoshop. Begin by designing the letterforms in Illustrator, then export the paths into Photoshop to apply lighting and textures.


Step 1: Create a circle to establish an idea of how the type should sit on the sphere. Select a bold font that will help the type read once distorted.


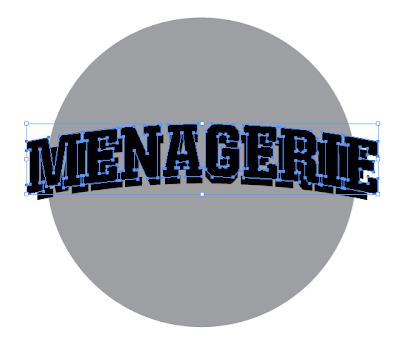
Step 2: Warp the text by going under EFFECT>WARP>ARC. Set the arc bend to approx 12%.


Step 3: Make a copy (apple+c) of the original type in case changes need to be made to it later. After the type has been warped, expand the type into paths by selecting OBJECT>EXPAND APPEARANCE. After expanding, copy (apple+c) and paste in front (apple+f). Adjust the type according to the correct perspective and scale it by holding shift+option+drag just slightly.


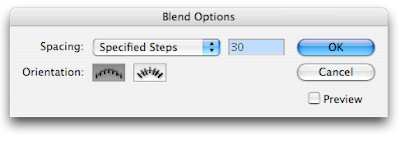
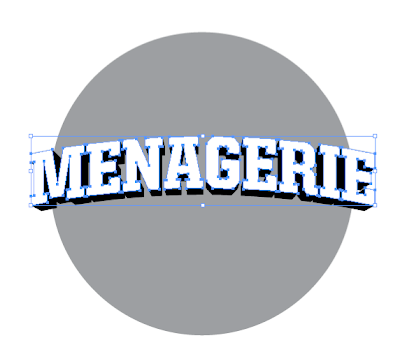
Step 4: Next, make a copy (apple+c) of the type into the clipboard. (This will be needed later). Now go to OBJECT>BLEND OPTIONS to modify the blend. Change the spacing to "specified steps" and enter a setting of 30. Click “OK” when you’re done. Select both of the types, and go to OBJECT>BLEND>MAKE. Now paste in front(apple+f) the type from the clipboard and change the color to white.


Step 5: Now that the type is okay, import the paths into Photoshop to add texture and lighting effects!

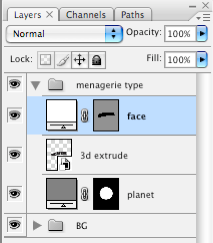
First, in the Illustrator file, copy the “blend” then paste (apple+v) in Photoshop as “smart object”. Second, in the Illustrator file, copy the “planet” then paste in Photoshop as “smart object”. Third, in the Illustrator file, copy the “face” then paste in Photoshop as “shape layer”.

Now that we have our type properly laid out on the planet we can begin adding textures and background to the rest of the type.


Step 6: You should have 3 layers in your Photoshop document.
1) planet
2) blend of the type
3) face of the type.


Step 7: Now to create a drop shadow on the type.

a) Apple+left click the blend layer to select it.
b) Create a new layer and label it shadow, fill the selection with black by
going to EDIT> FILL. Choose foreground color and make sure that it is black.
c) Deselect the shadow layer, and apply a gaussian blur by going to FILTER>BLUR.
d) Make a clipping mask of the shadow layer onto the planet layer by holding down the option key and clicking in between the shadow and planet layer. This removes the shadows outside the planet’s area.


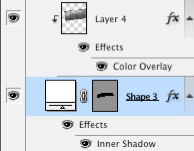
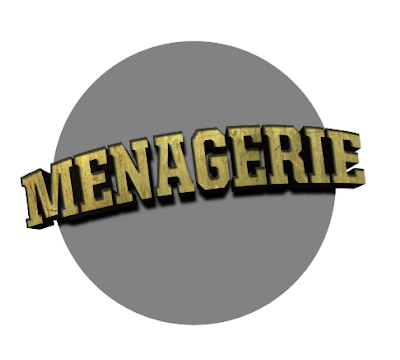
Step 8: Next, bring in a texture for your type. Place it on top of your face layer and make a clipping mask (option+click in between the layers). Then, apply an inner shadow to the face layer in order to give the type a little more depth. Add some color to the texture layer by adding a color overlay effect, set that effect to multiply to let the texture underneath show through.

* once your texture is laid onto the type. Change its layer mode to a setting that will make your type legible.


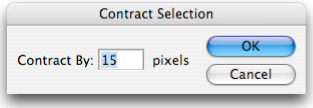
Step 9: Now that we have some color and texture on the type. Let’s give it a little variation (dark and light) in values so that it doesn't look so mechanical. Option+left click on the face layer to bring up its selection. Go to SELECT>MODIFY>CONTRACT. Enter a value that scales the selection so that you can apply some color to the inside of the type.

Once you have your selection, go to SELECT>MODIFY>FEATHER and enter a value anywhere from 10~20.

With your selection still available, create a new layer and name it variations and brush in darks and lights using a soft-edged brush. Press “x” to change from black or white when in the brush mode. After you are satisfied with your darks and lights, change the variations layer from normal to overlay.


Now you have your type all set up for the next tutorials!


Below are the links to PART TWO and THREE of the TUTORIAL

A Global Menagination - PART TWO

A Global Menaagination - PART THREE